Quick Start
There are just three core concepts involved in building automated workflows in Koreo: Workflows, ValueFunctions, and ResourceFunctions. This Quick Start guide will walk you through building, deploying, and running your first Workflow. As part of this, we will also see how FunctionTests act as an integral component for building Functions by providing rapid feedback through unit testing. After that, we will implement a slightly more sophisticated Workflow that automates the creation of a Kubernetes Service. Finally, we will show how Koreo enables the construction of custom abstractions that can encapsulate complex Kubernetes workflows and expose them through simple APIs.
Before we begin, ensure you have followed the installation instructions for the Koreo Controller and Tooling.
The Koreo Syntax is not much more than YAML + CEL. The tooling supports a number
of file suffixes including .k, .koreo, .k.yaml, and .k.yml. We recommend
using the latter two as it may prove more useful when viewing the code in your
Source Code site like GitHub or Gitlab, until we can grow the language and get
the .k suffix supported more widely.
Hello Koreo
We will build a Workflow that will do a very simple task: "stamp" every
Kubernetes Deployment with a hello label whose value will be the Deployment
name. While it's a contrived example, it will demonstrate some of the key
aspects of Koreo.
Writing a ValueFunction
First, we will write a ValueFunction called get-labels that returns the
labels we want to stamp on the Deployment. Specifically, this is just the
hello label which we will set to the name on the triggering resource's
metadata. We'll also include an accompanying FunctionTest that validates the
expected behavior.
- get-labels.k.yaml
- get-labels-test.k.yaml
apiVersion: koreo.dev/v1beta1
kind: ValueFunction
metadata:
  name: get-labels
spec:
  return:
    labels:
      hello: =inputs.name
apiVersion: koreo.dev/v1beta1
kind: FunctionTest
metadata:
  name: get-labels-test
spec:
  functionRef:
    kind: ValueFunction
    name: get-labels

  inputs:
    name: test

  testCases:
    - expectReturn:
        labels:
          hello: test
While we have placed the ValueFunction and corresponding FunctionTest in
separate files in the example above, note that a common practice is to place
Functions and FunctionTests in the same file separated by YAML document
separators (---).
This ValueFunction will be used as the first step in our Workflow. It uses a
CEL-based Koreo Expression, =inputs.name, to reference
the resource name which is passed in as an input to the Function. Our Function
simply returns a labels object with the hello label set.
ValueFunctions are pure functions, meaning they are side-effect free. They provide a way to validate data and build or reshape data structures to be consumed by other Functions. We will see in a later example how ValueFunctions can be used to enforce preconditions. While they tend to be simple in nature, ValueFunctions provide a composable and reusable primitive for common Workflow tasks that ends up being quite powerful.
The accompanying FunctionTest demonstrates how we can unit test our
ValueFunction. In it, we specify the Function under test, the inputs to it, and
a test case that validates the expected return values. There's not much to this
one because get-labels is such a simple Function, but we will look at more
sophisticated FunctionTests later. The Koreo Tooling
will run these tests automatically as you are writing your Koreo components.
Try changing hello to a different value in expectReturn and see how the
test breaks.
Congratulations, you've written your first Koreo ValueFunction and FunctionTest! Go ahead and apply it to the cluster:
kubectl apply -f get-labels.k.yaml
Unfortunately, on its own this Function does nothing, but in a moment we'll see how it can be used by a Workflow.
Writing a ResourceFunction
Next, we'll build the Function that will add the hello label to a Deployment.
If you recall, ValueFunctions are pure functions, and adding a label to a
Kubernetes resource is very much a side effect. Enter ResourceFunctions.
ResourceFunctions provide a way to interact with Kubernetes APIs by interfacing
with resources. In our case, we will be patching existing Deployment resources.
- set-deployment-labels.k.yaml
- set-deployment-labels-test.k.yaml
apiVersion: koreo.dev/v1beta1
kind: ResourceFunction
metadata:
  name: set-deployment-labels
spec:
  apiConfig:
    apiVersion: apps/v1
    kind: Deployment
    name: =inputs.name
    namespace: =inputs.namespace
    owned: false

  resource:
    metadata:
      labels: =inputs.labels

  create:
    enabled: false
apiVersion: koreo.dev/v1beta1
kind: FunctionTest
metadata:
  name: set-deployment-labels-test
spec:
  functionRef:
    kind: ResourceFunction
    name: set-deployment-labels

  inputs:
    name: test-deployment
    namespace: default
    labels:
      foo: bar
      baz: qux

  currentResource:
    apiVersion: apps/v1
    kind: Deployment
    metadata:
      name: test-deployment
      namespace: default

  testCases:
    - label: Sets labels
      expectResource:
        apiVersion: apps/v1
        kind: Deployment
        metadata:
          name: test-deployment
          namespace: default
          labels:
            foo: bar
            baz: qux
The set-deployment-labels ResourceFunction updates a Deployment by adding the
passed in labels to the resource's metadata. First, we specify the resource we
want to interface with using apiConfig. This configures the resource
apiVersion, kind, name, and namespace. Notice that name and
namespace are set to =inputs.name and =inputs.namespace, respectively.
These are Koreo Expressions that evaluate to the name and namespace inputs
passed into the Function. Additionally, we set owned to false, indicating
that we do not want Koreo to add the parent Deployment to the resource's
metadata.ownerReferences. This would be a circular reference since the parent
Deployment is also the resource we are updating.
We specify the update to the resource we want to apply in resource.
Specifically, we are setting the labels on the Deployment's metadata.
Lastly, we disable create, indicating that we do not want the resource to be
created in the event that it's missing. Instead, we are only interested in
updating existing Deployments.
By default, the definition provided to resource acts as a patch, meaning
Kubernetes will merge the values when updating the resource. For instance, if
the Deployment has existing labels, these will be preserved when the hello
label is added.
The corresponding FunctionTest shows how we can validate the behavior of
set-deployment-labels. As before, we specify our functionRef and inputs.
What's different this time is we also specify a currentResource. This lets us
simulate the current state of the resource in the cluster. We don't need to
include a full Deployment definition but rather just the parts relevant to our
ResourceFunction. Our test case then validates the update to be applied to the
resource with expectResource, in particular asserting that the expected
labels are present.
Apply set-deployment-labels to the cluster:
kubectl apply -f set-deployment-labels.k.yaml
Our ResourceFunction is now ready to be used.
Writing a Workflow
With our ValueFunction and ResourceFunction in place, we're now ready to put everything together into a Workflow. Workflows implement multi-step processes by orchestrating ValueFunctions, ResourceFunctions, and other sub-Workflows. The Workflow we're building is quite simple: read the metadata from a Deployment, compute a label to be applied, and update the Deployment with the new label.
- hello-koreo.k.yaml
apiVersion: koreo.dev/v1beta1
kind: Workflow
metadata:
  name: hello-koreo
spec:
  crdRef:
    apiGroup: apps
    version: v1
    kind: Deployment
  steps:
    - label: get_labels
      ref:
        kind: ValueFunction
        name: get-labels
      inputs:
        name: =parent.metadata.name
    - label: set_labels
      ref:
        kind: ResourceFunction
        name: set-deployment-labels
      inputs:
        name: =parent.metadata.name
        namespace: =parent.metadata.namespace
        labels: =steps.get_labels.labels
Let's walk through the different parts. First, we specify the parent resource
with crdRef. The parent resource is what acts as a "trigger" for the
Workflow. While it's called crdRef, this can in fact be any resource kind.
Though conceptually the parent resource acts as a trigger, in practice a
Workflow will run repeatedly as part of Kubernetes' reconciliation process.
This is known as a control loop. By default, the reconcile process will run
on create, update, and delete events pertaining to the parent resource as well
as every 20 minutes. ResourceFunctions can further configure the behavior
for these different events.
It's important to take care when using resources managed by another controller because there can be unintended interactions in some situations. As a result, it's encouraged to create your own CRDs for more advanced use cases.
Next, we specify our Workflow steps. The first step executes our get-labels
ValueFunction. We pass in the Deployment name with the Koreo Expression
=parent.metadata.name where =parent references the Deployment that
triggered our Workflow. The next step then invokes the set-deployment-labels
ResourceFunction, taking in the name and namespace from the parent
resource's metadata and the labels from the previous step's output.
That's it. Now we can deploy our Workflow and test it out.
kubectl apply -f hello-koreo.k.yaml
In the Koreo UI, this Workflow looks like the following:

Running the Workflow
To run the Workflow, we can apply a new Deployment to the cluster:
- deployment.yaml
apiVersion: apps/v1
kind: Deployment
metadata:
  name: nginx-deployment
spec:
  replicas: 1
  selector:
    matchLabels:
      app: nginx
  template:
    metadata:
      labels:
        app: nginx
    spec:
      containers:
        - name: nginx
          image: nginx:latest
          ports:
            - containerPort: 80
kubectl apply -f deployment.yaml
This will trigger our hello-koreo Workflow to run, which will apply the
hello label to the Deployment.
kubectl get deployment nginx-deployment -o yaml
Let's clean up the resources before moving on to the next example:
kubectl delete -f deployment.yaml
kubectl delete -f hello-koreo.k.yaml
kubectl delete -f set-deployment-labels.k.yaml
kubectl delete -f get-labels.k.yaml
We've built a simple Workflow comprised of a ValueFunction and ResourceFunction. We also saw how we can unit test Functions with FunctionTest. In the next example, we'll build on this by creating a slightly more sophisticated Workflow that does something a little more useful. It will automatically create a Service for a Deployment.
Hello Service
The previous example showed how we can interact with Kubernetes resources by
adding labels to a Deployment. Now let's look at how we can create resources
from a Workflow while also exploring some additional capabilities such as
Function preconditions and locals, Koreo Expression functions, variant
test cases, and skipIf. This Workflow will watch for Deployments with a
specific service label and, if present, will create a corresponding Service
for the Deployment.
Getting the Service Configuration
Like the previous example, we'll start by writing a ValueFunction that extracts
the necessary configuration from the Deployment. In this case, we'll create a
ValueFunction called get-service-config. This Function will return several
pieces of information:
- The
nameof the service we will create (from theservicelabel on the Deployment) - The
namespacefor the Service - The
selectorwhich determines the set of Pods targeted by the service - The
targetPortwhich is the container port on the Deployment the service will use
Additionally, the get-service-config Function will validate several
preconditions. As before, we've also included an accompanying FunctionTest.
- get-service-config.k.yaml
- get-service-config-test.k.yaml
apiVersion: koreo.dev/v1beta1
kind: ValueFunction
metadata:
  name: get-service-config
spec:
  preconditions:
  - assert: =has(inputs.metadata.labels.service)
    skip:
      message: Deployment does not have service label

  - assert: |
      =has(inputs.spec.selector.matchLabels) &&
        inputs.spec.selector.matchLabels.size() > 0
    skip:
      message: Deployment does not have selector.matchLabels

  - assert: =has(inputs.spec.template.spec.containers[0].ports[0].containerPort)
    skip:
      message: Deployment does not have containerPort

  return:
    name: =inputs.metadata.labels.service
    namespace: =inputs.metadata.namespace
    selector: =inputs.spec.selector.matchLabels
    targetPort: =inputs.spec.template.spec.containers[0].ports[0].containerPort
apiVersion: koreo.dev/v1beta1
kind: FunctionTest
metadata:
  name: get-service-config-test
spec:
  functionRef:
    kind: ValueFunction
    name: get-service-config

  inputs:
    metadata:
      namespace: default
      labels:
        service: hello-koreo
    spec:
      selector:
        matchLabels:
          app: nginx
      template:
        spec:
          containers:
            - name: nginx
              image: nginx:latest
              ports:
                - containerPort: 80

  testCases:
  - label: happy path
    expectReturn:
      name: hello-koreo
      namespace: default
      selector:
        app: nginx
      targetPort: 80

  - label: service label not present
    variant: true
    inputOverrides:
      metadata:
        labels:
    expectOutcome:
      skip:
        message: Deployment does not have service label

  - label: selector matchLabels not present
    variant: true
    inputOverrides:
      spec:
        selector:
    expectOutcome:
      skip:
        message: Deployment does not have selector.matchLabels

  - label: selector matchLabels empty
    variant: true
    inputOverrides:
      spec:
        selector:
          matchLabels:
    expectOutcome:
      skip:
        message: Deployment does not have selector.matchLabels

  - label: containerPort not present
    variant: true
    inputOverrides:
      spec:
        template:
          spec:
            containers:
    expectOutcome:
      skip:
        message: Deployment does not have containerPort
This ValueFunction introduces a new concept: preconditions. This allows us to
enforce rules in our Workflows. In this case, we are asserting three different
preconditions: ensuring the service label is present on the Deployment
metadata, ensuring the Deployment spec has at least one selector.matchLabels,
and ensuring there is a container port on the Deployment. You'll notice that
the Koreo Expressions in these preconditions are using some functions. In
particular, we're using the has function to check the presence of certain
fields and size() to check the number of fields in an object.
Preconditions include a predicate to assert along with either a defaultReturn
value or an outcome which informs the calling Workflow how to proceed if the
precondition fails. In our case, we are telling the Workflow to skip the step
and any steps that depend on it.
The corresponding FunctionTest includes several test cases that cover both the
happy path as well as the various preconditions. inputOverrides allows us to
overlay changes onto the base inputs of the FunctionTest. Normally, these
overrides would carry forward to subsequent test cases. However, because we set
variant: true, these overrides do not carry forward. This allows easily
testing edge or error cases without a bunch of test setup.
The precondition test cases also use expectOutcome to validate the Function
correctly returns the Skip outcome along with the appropriate message. Try
changing a precondition predicate and see how the test breaks.
Let's apply get-service-config to the cluster:
kubectl apply -f get-service-config.k.yaml
Creating the Service
Our get-service-config ValueFunction returns the information we need to
configure a Service for the Deployment. Now let's write the ResourceFunction
that actually creates the Service.
- service-factory.k.yaml
- service-factory-test.k.yaml
apiVersion: koreo.dev/v1beta1
kind: ResourceFunction
metadata:
  name: service-factory
spec:
  preconditions:
  - assert: |
      =inputs.name.matches("^[a-z0-9]([-a-z0-9]*[a-z0-9])?$")
    skip:
      message: "Invalid service name"

  - assert: =inputs.selector.size() > 0
    skip:
      message: "No selector"

  locals:
    ports:
      - protocol: TCP
        port: 80
        targetPort: =inputs.targetPort

  apiConfig:
    apiVersion: v1
    kind: Service
    name: =inputs.name
    namespace: =inputs.namespace

  resource:
    spec:
      selector: =inputs.selector
      ports: =locals.ports
      type: ClusterIP
apiVersion: koreo.dev/v1beta1
kind: FunctionTest
metadata:
  name: service-factory-test
spec:
  functionRef:
    kind: ResourceFunction
    name: service-factory

  inputs:
    name: hello-koreo
    namespace: default
    selector:
      app: nginx
    targetPort: 80

  testCases:
  - label: happy path
    expectResource:
      apiVersion: v1
      kind: Service
      metadata:
        name: hello-koreo
        namespace: default
      spec:
        selector:
          app: nginx
        ports:
          - protocol: TCP
            port: 80
            targetPort: 80
        type: ClusterIP

  - label: empty service name
    variant: true
    inputOverrides:
      name: ""
    expectOutcome:
      skip:
        message: "Invalid service name"

  - label: invalid service name
    variant: true
    inputOverrides:
      name: "-invalid-name"
    expectOutcome:
      skip:
        message: "Invalid service name"

  - label: no selector
    variant: true
    inputOverrides:
      selector:
    expectOutcome:
      skip:
        message: "No selector"
As with the previous Function, we've included some preconditions to validate
the data coming in. Specifically, we are ensuring that the service name is a
valid Kubernetes resource name and that there is at least one selector. The
service-factory Function also makes use of locals, which are a convenient
way to manage interim computed values or constants used in a Function or for
making complex expressions more ergonomic to write. In this case, we are using
a local to define the ports specified on the Service.
Like the Hello Koreo example, we specify the resource we want
our ResourceFunction to manage with apiConfig. Lastly, we specify our Service
configuration using an inline Target Resource Specification
with resource.
The Target Resource Specification is the fully materialized resource view that
will be applied to the cluster. This can be assembled in a variety of ways:
resource provides a way to specify an inline static configuration,
resourceTemplateRef allows dynamically loading a static "base" configuration,
and overlays provide a mechanism to apply overlays as atomic units
onto the Target Resource Specification. These methods can be combined to create
a "layered" approach to resource materialization in a deterministic manner.
The service-factory-test validates the happy path for our ResourceFunction as
well as the various precondition cases to ensure the appropriate outcome is
returned when the business rules are violated.
Let's apply service-factory to the cluster:
kubectl apply -f service-factory.k.yaml
Building the Workflow
Now we're ready to build the Workflow. Like the previous example, we will
trigger off of a Deployment, then we will extract the configuration to use for
our Service from the parent Deployment, and finally we will create the Service.
Unlike the previous example, we will only act on Deployments that have a
specific service label.
- hello-service.k.yaml
apiVersion: koreo.dev/v1beta1
kind: Workflow
metadata:
  name: hello-service
spec:
  crdRef:
    apiGroup: apps
    version: v1
    kind: Deployment

  steps:
    - label: get_service_config
      skipIf: =!has(parent.metadata.labels)
      ref:
        kind: ValueFunction
        name: get-service-config
      inputs:
        metadata: =parent.metadata
        spec: =parent.spec

    - label: create_service
      ref:
        kind: ResourceFunction
        name: service-factory
      inputs:
        name: =steps.get_service_config.name
        namespace: =steps.get_service_config.namespace
        selector: =steps.get_service_config.selector
        targetPort: =steps.get_service_config.targetPort
You'll notice something new on the first step in our Workflow: skipIf. This
provides a way to conditionally run steps. When the skipIf evaluates to true,
the step and its dependencies are skipped. In this case, we are exiting the
Workflow if the parent Deployment does not have any metadata labels. Recall
that the get-service-config Function ensures that the Deployment specifically
has the service label and, if not, will also exit the Workflow by returning a
skip outcome.
We pass in the Deployment's metadata and spec to get-service-config as
inputs, and it will either return a skip outcome or the configuration for
our Service. We then pass in the return values from get-service-config into
service-factory, which will either create the Service resource or return a
skip outcome if invariants are not met.
A ResourceFunction acts as a control loop for the resource it manages—it will attempt to bring the resource into alignment with the Target Resource Specification. Workflows and their respective Functions will execute continually as part of Kubernetes' reconciliation process, but if the resource is already aligned with the Target Resource Specification, then the ResourceFunction will be a no-op. In this sense, ResourceFunctions are idempotent with respect to the resources they manage.
We're now ready to apply our Workflow to the cluster:
kubectl apply -f hello-service.k.yaml
A Koreo Controller does not allow multiple Workflows to trigger off the same resource. Ensure you've cleaned up the previous hello-koreo example Workflow.
Running the Workflow
There are a couple cases we will try with our Workflow: a Deployment that
does not have the service label present and one that does. The first should
result in the Workflow being skipped, and the second should result in a Service
being created. First, let's try a Deployment that doesn't have the label. We'll
use the same Deployment from earlier:
- deployment.yaml
- deployment-with-label.yaml
apiVersion: apps/v1
kind: Deployment
metadata:
  name: nginx-deployment
spec:
  replicas: 1
  selector:
    matchLabels:
      app: nginx
  template:
    metadata:
      labels:
        app: nginx
    spec:
      containers:
        - name: nginx
          image: nginx:latest
          ports:
            - containerPort: 80
apiVersion: apps/v1
kind: Deployment
metadata:
  name: nginx-deployment
  labels:
    service: nginx-svc
spec:
  replicas: 1
  selector:
    matchLabels:
      app: nginx
  template:
    metadata:
      labels:
        app: nginx
    spec:
      containers:
        - name: nginx
          image: nginx:latest
          ports:
            - containerPort: 80
kubectl apply -f deployment.yaml
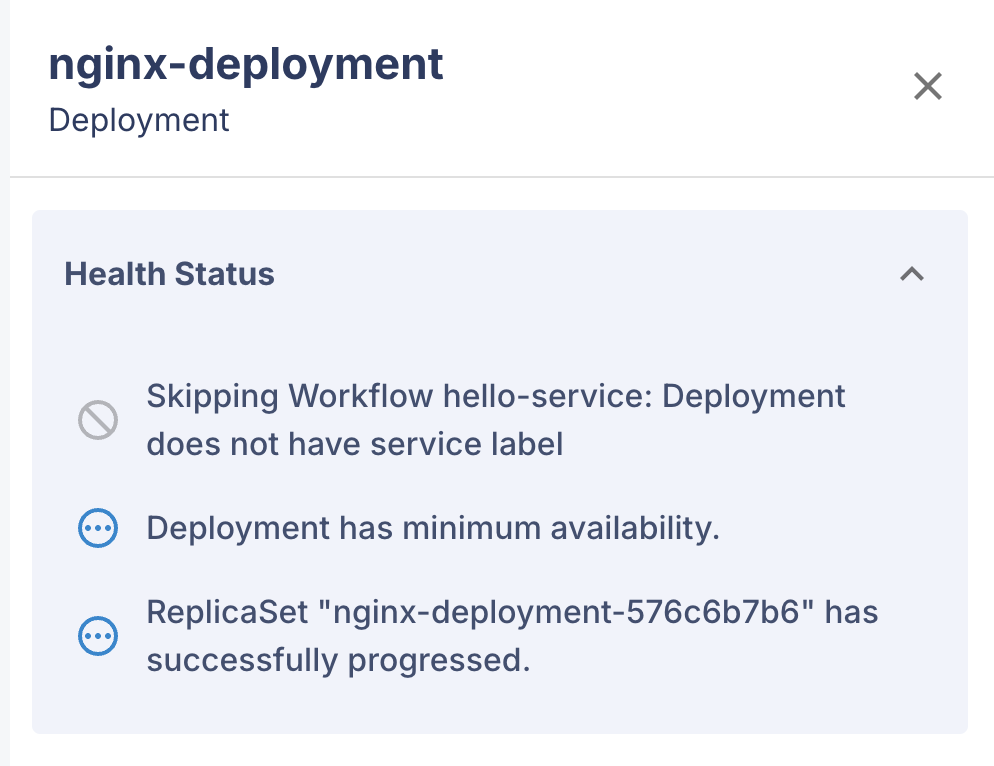
In the Koreo UI for the Workflow instance pertaining to our Deployment, if we
click on the status for nginx-deployment we will see that the Workflow has been
skipped due to the missing service label.
We can also validate this using kubectl:
kubectl get deployment nginx-deployment -o yaml
This will show a condition on the Deployment indicating the same.
Now let's try the Deployment that does have the service label:
kubectl delete -f deployment.yaml
kubectl apply -f deployment-with-label.yaml
The Workflow instance should look like the following in the Koreo UI once it finishes reconciling:

We can also check the Service with kubectl:
kubectl get service nginx-svc -o yaml
We should see something like the following:
apiVersion: v1
kind: Service
metadata:
  annotations:
    koreo.dev/last-applied-configuration: '{"spec": {"ports": [{"port": 80, "protocol":
      "TCP", "targetPort": 80}], "selector": {"app": "nginx"}, "type": "ClusterIP"},
      "apiVersion": "v1", "kind": "Service", "metadata": {"name": "nginx-svc", "namespace":
      "default", "ownerReferences": [{"apiVersion": "apps/v1", "kind": "Deployment",
      "blockOwnerDeletion": true, "controller": false, "name": "nginx-deployment",
      "uid": "d0f901ce-d6cf-44c8-ba18-ec9dbfee5ae7"}]}}'
  creationTimestamp: "2025-03-15T03:46:03Z"
  name: nginx-svc
  namespace: default
  ownerReferences:
  - apiVersion: apps/v1
    blockOwnerDeletion: true
    controller: false
    kind: Deployment
    name: nginx-deployment
    uid: d0f901ce-d6cf-44c8-ba18-ec9dbfee5ae7
  resourceVersion: "77983536"
  uid: 85a57085-4134-45b8-bad0-a3c97ac8c3cf
spec:
  clusterIP: 34.118.239.12
  clusterIPs:
  - 34.118.239.12
  internalTrafficPolicy: Cluster
  ipFamilies:
  - IPv4
  ipFamilyPolicy: SingleStack
  ports:
  - port: 80
    protocol: TCP
    targetPort: 80
  selector:
    app: nginx
  sessionAffinity: None
  type: ClusterIP
status:
  loadBalancer: {}
You'll note that the Service has an ownerReferences referencing the parent
Deployment. This is because we did not set owned: false in the
service-factory ResourceFunction.
As before, let's clean up the resources before moving on to the final Quick Start example:
kubectl delete -f deployment-with-label.yaml
kubectl delete -f hello-service.k.yaml
kubectl delete -f service-factory.k.yaml
kubectl delete -f get-service-config.k.yaml
This slightly more advanced Workflow has shown how we can orchestrate resource creation while also exploring some additional Koreo features. In the final Quick Start example, we will build a custom workload abstraction that encapsulates both a Deployment and Service using a single API while continuing to build on our Koreo knowledge.
Hello Workload
We've seen how we can use Koreo to configure and orchestrate Kubernetes
resources. While the examples we've looked at have been relatively simple,
these same primitives can be composed to build quite powerful abstractions. In
this final Quick Start example, we will get a glimpse at how Koreo can be used
to build platform abstractions that can encapsulate complex workflows that are
exposed to developers through simple APIs. The Workflow we implement will
provide a "workload" abstraction that encapsulates a Deployment and a Service
together as a single component. We will also look at some additional Koreo
features like resourceTemplateRef, overlays, and Workflow conditions and
state.
Workload CRD
Our workload abstraction will be implemented using a Kubernetes Custom Resource
Definition (CRD). Like all resource kinds in Kubernetes, CRDs act as an API.
Koreo enables us to implement the API without the need for building custom
controllers. To keep things simple, our workload will have just a few fields on
it: a container, which will configure the image and port, and an environment,
which will be one of dev, staging, or prod.
- workload-crd.yaml
apiVersion: apiextensions.k8s.io/v1
kind: CustomResourceDefinition
metadata:
  name: workloads.example.koreo.dev
spec:
  group: example.koreo.dev
  names:
    kind: Workload
    listKind: WorkloadList
    plural: workloads
    singular: workload
  scope: Namespaced
  versions:
    - name: v1
      served: true
      storage: true
      schema:
        openAPIV3Schema:
          type: object
          properties:
            spec:
              type: object
              properties:
                container:
                  type: object
                  properties:
                    image:
                      type: string
                    port:
                      type: integer
                  required: ["image", "port"]
                environment:
                  type: string
                  enum: ["dev", "staging", "prod"]
              required: ["container", "environment"]
            status:
              x-kubernetes-preserve-unknown-fields: true
              type: object
Koreo Tooling provides a tool for generating a Custom Resource Definition from a Workflow.
Let's go ahead and apply our Workload CRD to the cluster:
kubectl apply -f workload-crd.yaml
Kubernetes uses Role-Based Access Control (RBAC) to ensure that cluster users and workloads have only the access to resources required to execute their roles. Both the Koreo Controller and Koreo UI rely on RBAC to access resources in the cluster. These provide default Roles with base required permissions but should be customized to your needs.
For this example, ensure your deployed Koreo Controller has the appropriate
permissions for the CRD. The development Helm chart value enables superuser
capabilities on the Controller and UI, making it easy to get started (this
setting is not intended for production usage).
Deployment ResourceTemplate
Up until now, we have only seen resources that are materialized using an inline
resource definition on the ResourceFunction. However, resources can also be
materialized using ResourceTemplates and resource
overlays.
ResourceTemplates allow us to provide a base configuration, which can be loaded
dynamically, and overlays allow us to customize the configuration according to
business rules.
We'll start by implementing a ResourceTemplate that specifies the base configuration for our Workload Deployments.
- deployment-template.k.yaml
apiVersion: koreo.dev/v1beta1
kind: ResourceTemplate
metadata:
  name: deployment-template
spec:
  template:
    apiVersion: apps/v1
    kind: Deployment
    spec:
      replicas: 1
      selector:
        matchLabels:
          app: nginx
      template:
        metadata:
          labels:
            app: nginx
        spec:
          containers:
            - name: nginx
              image: nginx:latest
              ports:
                - containerPort: 80
ResourceTemplates are pretty straightforward. The template field is simply a
definition (or partial definition) of the resource being templated. We'll see
in a bit how this gets used to materialize a Deployment.
Apply the deployment-template to the cluster:
kubectl apply -f deployment-template.k.yaml
ValueFunctions as Overlays
Next, we're going to implement a ValueFunction which is going to provide some
configuration to the Deployment based on the Workload's environment. This will
be overlaid on top of the configuration from the deployment-template.
- get-deployment-config.k.yaml
- get-deployment-config-test.k.yaml
apiVersion: koreo.dev/v1beta1
kind: ValueFunction
metadata:
  name: get-deployment-config
spec:
  locals:
    replicas: |
      =inputs.env == "prod" ? 3 : 1
  return:
    spec:
      replicas: =locals.replicas
apiVersion: koreo.dev/v1beta1
kind: FunctionTest
metadata:
  name: get-deployment-config-test
spec:
  functionRef:
    kind: ValueFunction
    name: get-deployment-config

  inputs:
    env: dev

  testCases:
  - label: dev environment
    expectReturn:
      spec:
        replicas: 1

  - label: prod environment
    inputOverrides:
      env: prod
    expectReturn:
      spec:
        replicas: 3
Here we are creating a ValueFunction that returns an overlay specifying the
number of replicas to set on the Deployment based on the environment. In
practice, this logic might be better served as an inline overlay rather than
a separate ValueFunction, but this illustrates how we can factor complex
resource configurations into small, reusable components.
Apply get-deployment-config to the cluster:
kubectl apply -f get-deployment-config.k.yaml
Next, we'll see how the ResourceTemplate and overlay are used in a ResourceFunction.
Materializing the Deployment
With our Deployment ResourceTemplate and overlay ValueFunction, we're now ready to implement the ResourceFunction that will materialize the Deployment for a Workload.
- deployment-factory.k.yaml
- deployment-factory-test.k.yaml
apiVersion: koreo.dev/v1beta1
kind: ResourceFunction
metadata:
  name: deployment-factory
spec:
  preconditions:
  - assert: |
      =inputs.name.matches("^[a-z0-9]([-a-z0-9]*[a-z0-9])?$")
    skip:
      message: "Invalid deployment name"

  - assert: |
      =inputs.env == "dev" || inputs.env == "staging" || inputs.env == "prod"
    permFail:
      message: "Invalid environment"

  apiConfig:
    apiVersion: apps/v1
    kind: Deployment
    name: =inputs.name + "-deployment"
    namespace: =inputs.namespace

  resourceTemplateRef:
    name: deployment-template

  overlays:
  - overlay:
      metadata:
        labels:
          env: =inputs.env
          workload: =inputs.name
      spec:
        selector:
          matchLabels:
            app: =inputs.name
        template:
          metadata:
            labels:
              app: =inputs.name
          spec:
            containers:
              - name: =inputs.name
                image: =inputs.image
                ports:
                  - containerPort: =inputs.port
  - overlayRef:
      kind: ValueFunction
      name: get-deployment-config
    inputs:
      env: =inputs.env
apiVersion: koreo.dev/v1beta1
kind: FunctionTest
metadata:
  name: deployment-factory-test
spec:
  functionRef:
    kind: ResourceFunction
    name: deployment-factory

  inputs:
    name: test
    namespace: default
    image: test-api:latest
    port: 3000
    env: dev

  testCases:
  - label: happy path (dev)
    expectResource:
      apiVersion: apps/v1
      kind: Deployment
      metadata:
        name: test-deployment
        namespace: default
        labels:
          env: dev
          workload: test
      spec:
        replicas: 1
        selector:
          matchLabels:
            app: test
        template:
          metadata:
            labels:
              app: test
          spec:
            containers:
              - name: test
                image: test-api:latest
                ports:
                  - containerPort: 3000

  - label: happy path (prod)
    variant: true
    inputOverrides:
      env: prod
    expectResource:
      apiVersion: apps/v1
      kind: Deployment
      metadata:
        name: test-deployment
        namespace: default
        labels:
          env: prod
          workload: test
      spec:
        replicas: 3
        selector:
          matchLabels:
            app: test
        template:
          metadata:
            labels:
              app: test
          spec:
            containers:
              - name: test
                image: test-api:latest
                ports:
                  - containerPort: 3000

  - label: empty deployment name
    variant: true
    inputOverrides:
      name: ""
    expectOutcome:
      skip:
        message: "Invalid deployment name"

  - label: invalid deployment name
    variant: true
    inputOverrides:
      name: "-invalid-name"
    expectOutcome:
      skip:
        message: "Invalid deployment name"

  - label: invalid environment
    variant: true
    inputOverrides:
      env: preprod
    expectOutcome:
      permFail:
        message: "Invalid environment"
We use resourceTemplateRef to specify our Deployment ResourceTemplate to use
as the base resource configuration. While we are directly specifying
deployment-template, note that these can also be Koreo Expressions, allowing
you to dynamically load the ResourceTemplate.
We then use overlays to further customize the Deployment. The first overlay
is an inline overlay, which specifies the sub-structure to apply on top of
the configuration. This inline overlay configures some metadata labels to apply
to the Deployment along with the selector and container information. The next
overlay is an overlayRef, which applies the return value of
get-deployment-config to the resource. As you can see, overlays can be used
to apply layers of configuration to a resource based on business logic.
Let's apply the ResourceFunction to the cluster:
kubectl apply -f deployment-factory.k.yaml
Service ResourceTemplate
Next up is writing the ResourceTemplate for the Service. This is much like the previous ResourceTemplate we implemented but instead of a Deployment we're specing out a Kubernetes Service.
- service-template.k.yaml
apiVersion: koreo.dev/v1beta1
kind: ResourceTemplate
metadata:
  name: service-template
spec:
  template:
    apiVersion: v1
    kind: Service
    spec:
      selector:
        app: nginx
      ports:
        - protocol: TCP
          port: 80
          targetPort: 80
      type: ClusterIP
Deploy the ResourceTemplate:
kubectl apply -f service-template.k.yaml
Materializing the Service
We're ready to build the Service. We'll name this ResourceFunction
service-factory.v2 to avoid conflicting with the service-factory Function
we built in the previous example.
- service-factory-v2.k.yaml
- service-factory-v2-test.k.yaml
apiVersion: koreo.dev/v1beta1
kind: ResourceFunction
metadata:
  name: service-factory.v2
spec:
  preconditions:
  - assert: |
      =inputs.name.matches("^[a-z0-9]([-a-z0-9]*[a-z0-9])?$")
    skip:
      message: "Invalid service name"

  apiConfig:
    apiVersion: v1
    kind: Service
    name: =inputs.name + "-svc"
    namespace: =inputs.namespace

  resourceTemplateRef:
    name: service-template

  overlays:
  - overlay:
      metadata:
        labels:
          env: =inputs.env
          workload: =inputs.name
      spec:
        selector:
          app: =inputs.name
        ports:
          - protocol: TCP
            port: 80
            targetPort: =inputs.targetPort

  return:
    clusterIP: =resource.spec.clusterIP
apiVersion: koreo.dev/v1beta1
kind: FunctionTest
metadata:
  name: service-factory.v2-test
spec:
  functionRef:
    kind: ResourceFunction
    name: service-factory.v2

  inputs:
    name: hello-koreo
    namespace: default
    env: dev
    targetPort: 3000

  testCases:
  - label: happy path
    expectResource:
      apiVersion: v1
      kind: Service
      metadata:
        name: hello-koreo-svc
        namespace: default
        labels:
          env: dev
          workload: hello-koreo
      spec:
        selector:
          app: hello-koreo
        ports:
          - protocol: TCP
            port: 80
            targetPort: 3000
        type: ClusterIP

  - label: happy path return value
    overlayResource:
      spec:
        clusterIP: 34.118.232.84
    expectReturn:
      clusterIP: 34.118.232.84

  - label: empty service name
    variant: true
    inputOverrides:
      name: ""
    expectOutcome:
      skip:
        message: "Invalid service name"

  - label: invalid service name
    variant: true
    inputOverrides:
      name: "-invalid-name"
    expectOutcome:
      skip:
        message: "Invalid service name"
This ResourceFunction uses a .v2 suffix in the name to indicate a version.
While not required, versioning via this naming convention is encouraged as it
enables Koreo resources to be evolved over time without breaking existing
users.
This ResourceFunction looks much like deployment-factory. It similarly relies
on a ResourceTemplate to provide the base resource configuration and overlays
to customize it. In this case, we use an inline overlay to specify labels,
selector, and ports on the Service. What's different, however, is that this
ResourceFunction has a return value. In particular, we are returning the
clusterIP that Kubernetes dynamically assigns to the Service. We'll see how
this gets used later.
The corresponding FunctionTest also demonstrates how we can test return
values that come from the resource state. Specifically, the happy path return value test case shows how we can use overlayResource to simulate updates to
the resource in the cluster. We then validate that the clusterIP value is
returned from the Function with expectReturn.
Go ahead and apply service-factory.v2 to the cluster:
kubectl apply -f service-factory-v2.k.yaml
Building the Workflow
We're ready to implement the Workflow:
- hello-workload.k.yaml
apiVersion: koreo.dev/v1beta1
kind: Workflow
metadata:
  name: hello-workload
spec:
  crdRef:
    apiGroup: example.koreo.dev
    version: v1
    kind: Workload

  steps:
    - label: create_deployment
      ref:
        kind: ResourceFunction
        name: deployment-factory
      inputs:
        name: =parent.metadata.name
        namespace: =parent.metadata.namespace
        env: =parent.spec.environment
        image: =parent.spec.container.image
        port: =parent.spec.container.port
      condition:
        type: Deployment
        name: Workload Deployment

    - label: create_service
      ref:
        kind: ResourceFunction
        name: service-factory.v2
      inputs:
        name: =parent.metadata.name
        namespace: =parent.metadata.namespace
        env: =parent.spec.environment
        targetPort: =parent.spec.container.port
      condition:
        type: Service
        name: Workload Service
      state:
        service:
          clusterIP: =value.clusterIP
Recall that our Workflow will trigger off of instances of our Workload CRD. We then have two steps: create the Deployment and create the Service. These steps invoke the respective ResourceFunctions and pass in the necessary fields from the parent Workload.
We've introduced two new concepts in this Workflow: condition and state. A
Workflow step can specify a condition which the Workflow uses to set on the
parent resource's status.conditions. This is useful to surface the status of
Workflow sub-processes. Values in a step's state will be set on the parent
resource's status.state. This can be useful to cache values or to surface
them to other tools such as a UI or CLI. In this case, we are setting the
returned clusterIP from the Service on the parent Workload.
Let's apply the Workflow and then test it out:
kubectl apply -f hello-workload.k.yaml
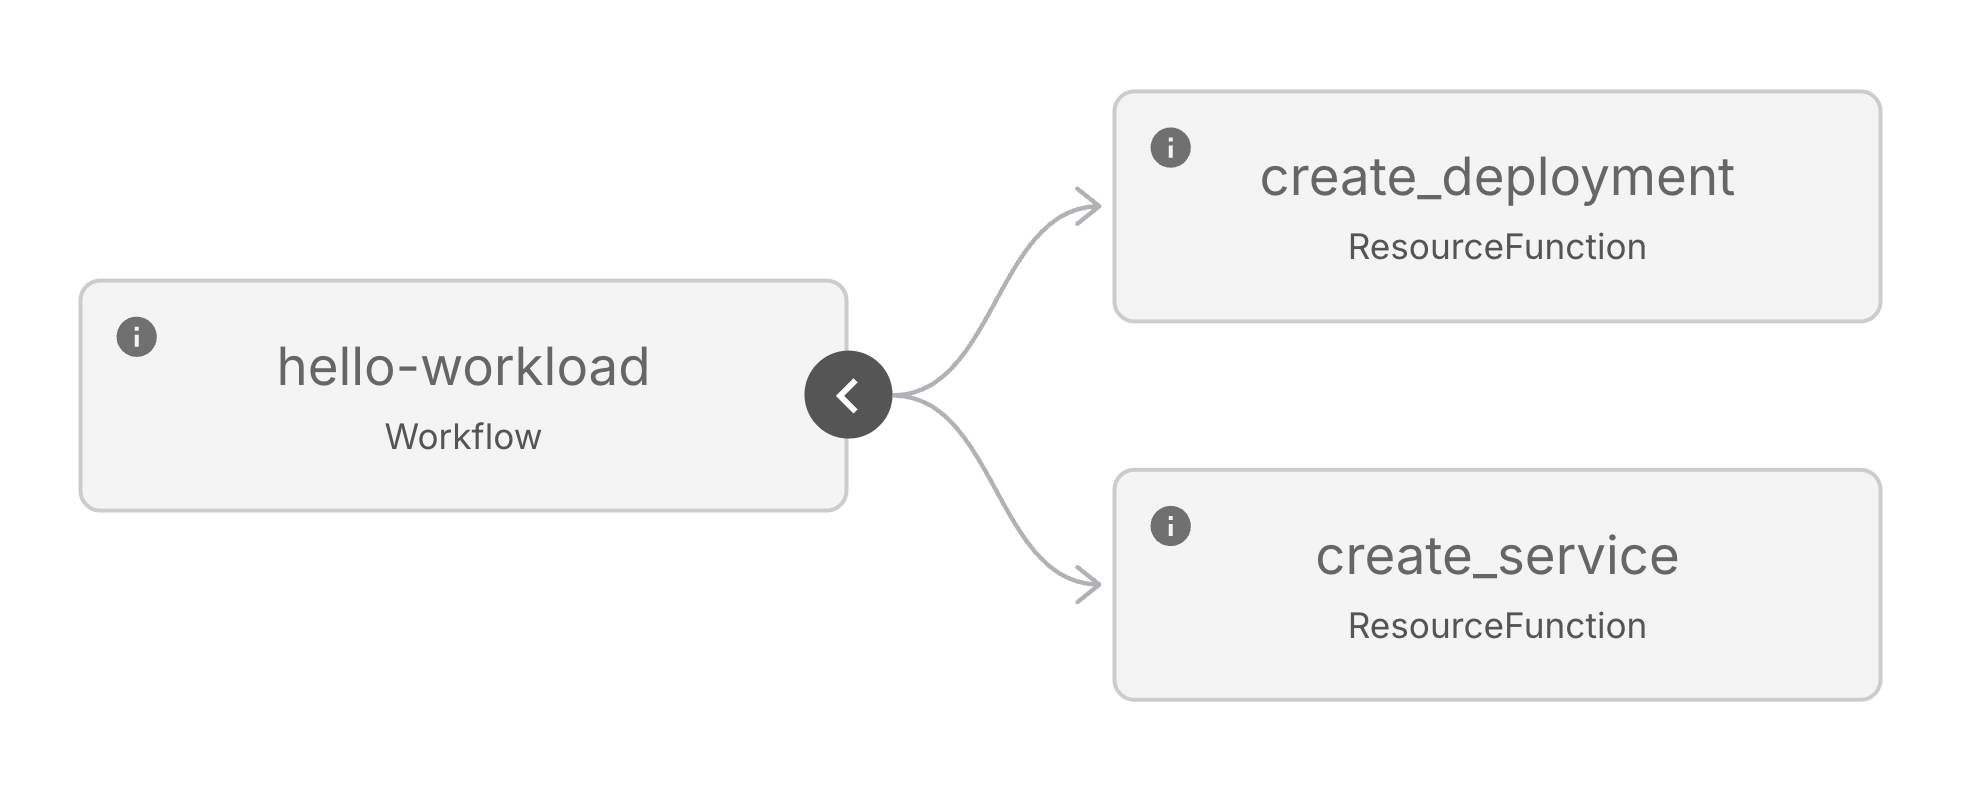
The Workflow will look like the following:
Because the create_deployment and create_service steps don't have any
dependencies on each other, they are able to execute in parallel.
Running the Workflow
To test out our Workflow, we need to create an instance of our Workload CRD:
- workload.yaml
apiVersion: example.koreo.dev/v1
kind: Workload
metadata:
  name: my-app
spec:
  container:
    image: nginx:latest
    port: 80
  environment: prod
kubectl apply -f workload.yaml
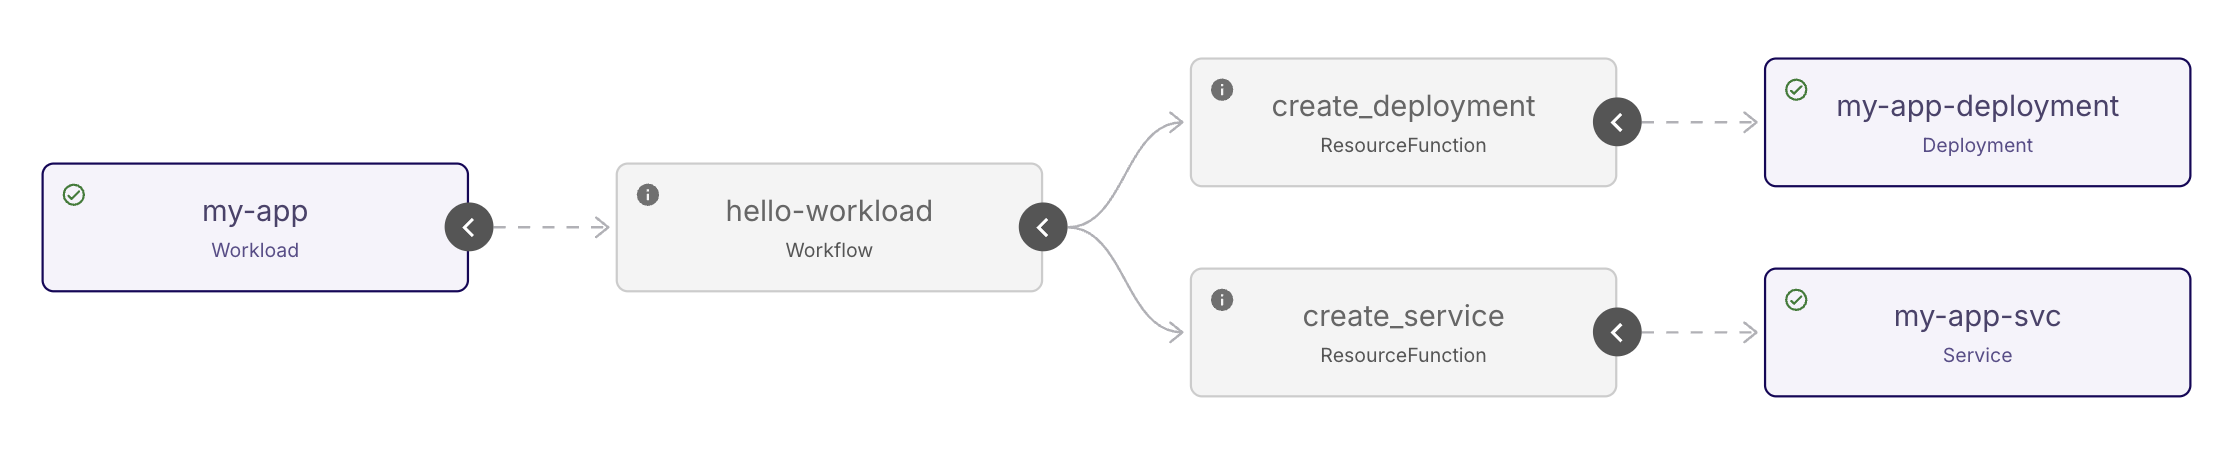
In the Koreo UI, we should momentarily see our Workflow instance reconcile:
We can check that the Deployment has the correct number of replicas based on the Workload's environment (3):
kubectl get deployment my-app-deployment -o yaml
We can also validate that the triggering Workload has the conditions from our
Workflow steps along with the Service's clusterIP in its status:
kubectl get workload my-app -o yaml
You can run the following to clean up the resources from this example:
kubectl delete -f workload.yaml
kubectl delete -f hello-workload.k.yaml
kubectl delete -f service-factory-v2.k.yaml
kubectl delete -f service-template.k.yaml
kubectl delete -f deployment-factory.k.yaml
kubectl delete -f get-deployment-config.k.yaml
kubectl delete -f deployment-template.k.yaml
kubectl delete -f workload-crd.yaml
Well done for making it this far! You've now built your own custom workload abstraction. While it may seem simple, this same idea can be extended to automate other aspects of Kubernetes or even cloud infrastructure with the help of operators like AWS' ACK or Google Cloud's Config Connector. Koreo enables you to compose Kubernetes controllers into cohesive platforms. It's sort of like LEGO blocks for platform engineering. Through simple primitives, we can build quite powerful abstractions that are deterministic and testable.
There are still more capabilities to learn that we haven't covered in this Quick Start guide. Dive into the documentation to explore Koreo's other features or take a look at the Examples section to see more advanced use cases.